Hi. I’m just here to share some tips on building a rover with Cube and other common peripherals. Most of the instructions are written in Ardupilot wiki.
Rover with Here2
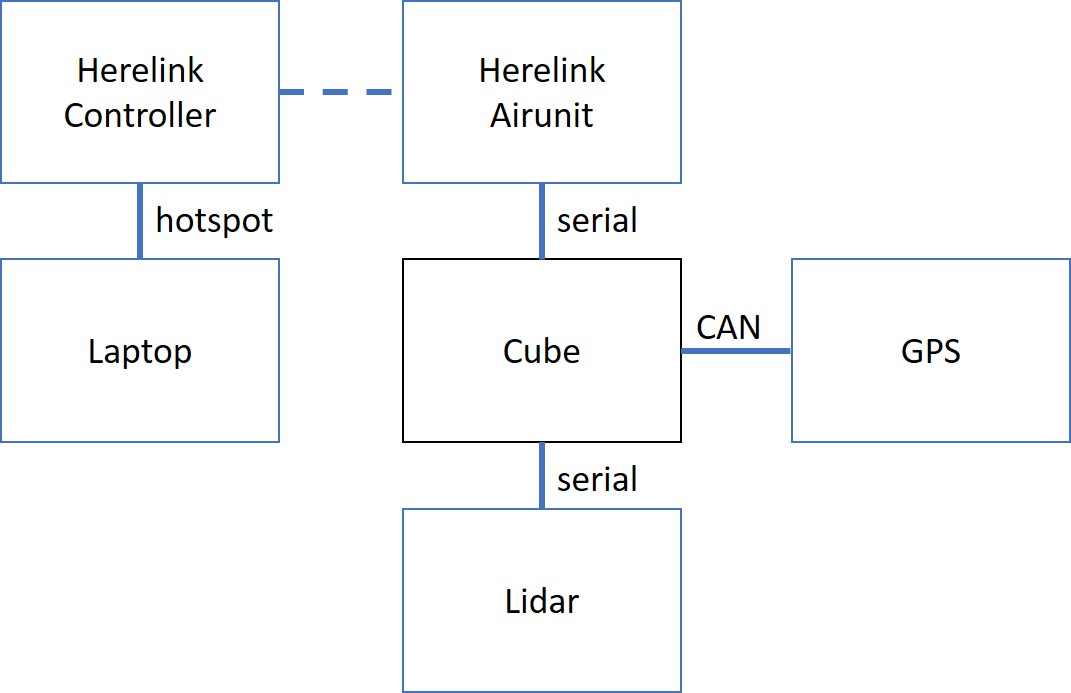
Cube: Black
GPS: Here3
Lidar: Rplidar A2
This build is quite straight forward. Setting up everything and it should work. The couplers on my rover were 3D printed and they loosen over time. Therefore it is not moving quite perfectly straight in the video.
Setup are exactly same as instruction in Ardupilot wiki

Rover with Realsense T265
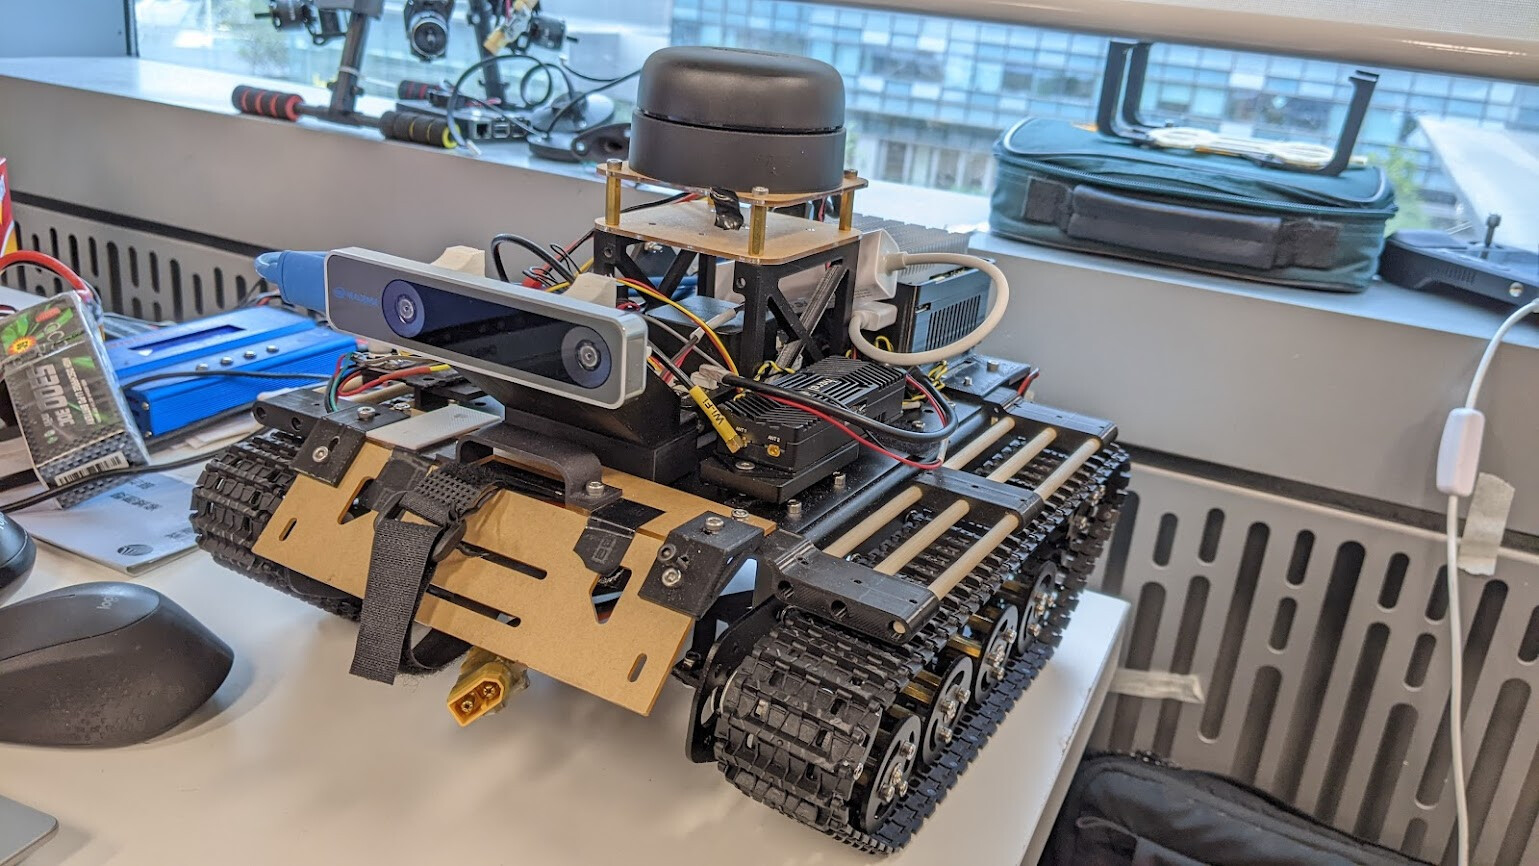
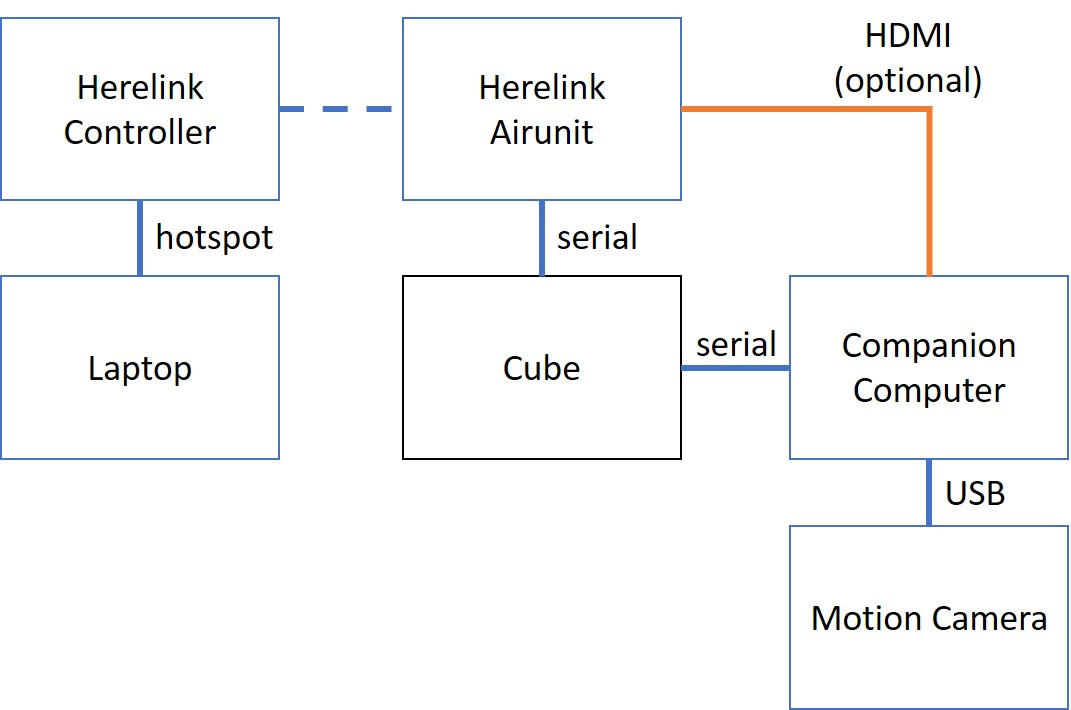
Cube: Black
Companion computer: Raspberry Pi (w. APSync) /Intel UP2 (w. Ubuntu 18)
Motion camera: Intel Realsense T265
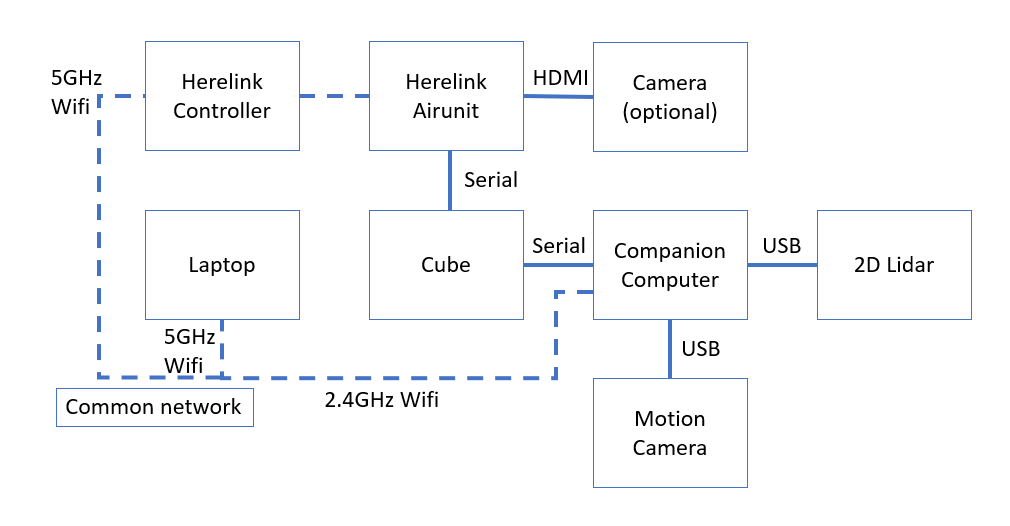
Another build a rover with companion computer and vision positioning sensor
Companion computer Setup
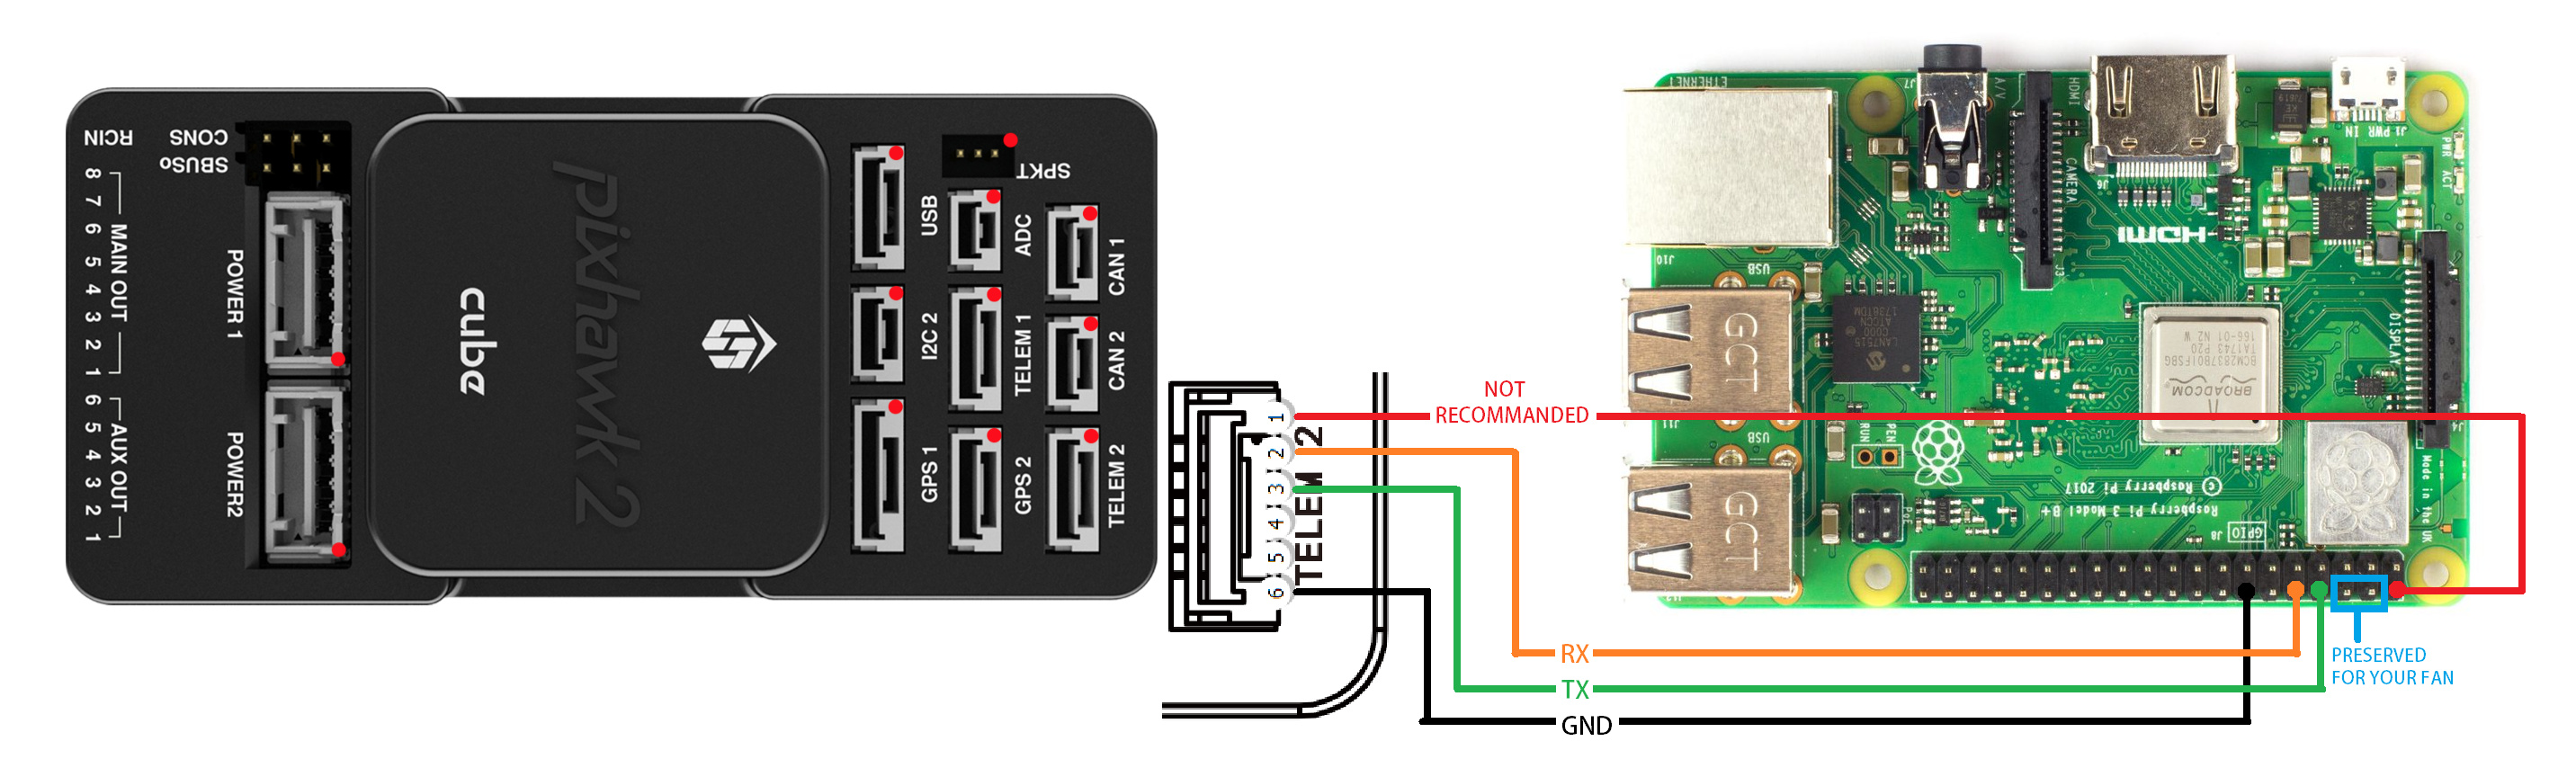
Raspberry Pi connection
Flash APSync into the SD card. The T265 scripts should be already installed.
If you want to use raspbian, setup as mentioned here
If you use Ubuntu, follow the steps here
UP2 connection

Connect the UP2 with telem port, according to its pinout.
Setup the UP2 system as mentioned in their wiki (eg: Ubuntu). You will need to install their kernal to enable the HAT.
I’m using ubuntu 18.
If you connect them as shown in the figure above, the Cube should appear in ttyS5.
Software Installation and Parameter Setup
Setup the companion computer if you are not using APSync. If you use APSync, start from Configure ArduPilot.
I’m using EK3 with compass disabled.
Prerequisite
Install mavproxy for ease on verifying connection to autopilot
Remove modemmanager so that it won’t conflict with serial communication
Install mavlink router to route more ports for potential usages
Follow the instructions in wiki to complete the remaining steps:
Mavlink Router Setting
Create the config file in /etc/mavlink-router/main.conf
[General]
ReportStats=false
MavlinkDialect=auto
[UartEndpoint alfa]
Device = /dev/ttyS5
Baud = 921600
[UdpEndpoint bravo]
Mode = Normal
Address = 127.0.0.1
Port = 14460
[UdpEndpoint Charlie]
Mode = Normal
Address = 127.0.0.1
Port = 14470
Make autorun at boot
Create the bash script mavlink_router.sh
#!/bin/bash
mavlink-routerd
Create the service in /etc/systemd/system/mavlink_router.service
[Unit]
Description=Mavlink Router Service
After=multi-user.target
StartLimitIntervalSec=0
Conflicts=
[Service]
User={your username}
EnvironmentFile=
ExecStartPre=
ExecStart={path to mavlink_rounter.sh}
Restart=on-failure
RestartSec=1
[Install]
WantedBy=multi-user.target
Enable and start the service
systemctl start mavlink_router
systemctl enable mavlink_router
T265 with UDP port
We have routed port 14460 and 14470 from serial port. Now we can use them to connect to autopilot.
Base on the T265 script (serial) in wiki, further modify it:
connection_string_default = 'udpin:127.0.0.1:14460'
conn = mavutil.mavlink_connection(
connection_string,
autoreconnect = True,
source_system = 255,
source_component = 93,
target_system = 1
)
Make autorun at boot
Same as wiki but since we use udp routed my mavlink router, we want it to start after mavlink router service. In the first part of t265.service:
[Unit]
Description=Realsense T265 Service
After=multi-user.target mavlink_outer.service
StartLimitIntervalSec=0
Conflicts=
Don’t forget to start and enable the service.
In some system (or hardware, I don’t actually know which one to blame), the service don’t start until its desktop initialized. If you don’t have any monitor/HDMI output connected, the service will stay inactive forever. In that case, you will need a HDMI dummy plug.
Connection Test
Now if you have gone through the steps, it should work. Verify this in Mission Planner as mentioned in wiki.
The port 14470 is a spare, you can connect it from companion computer via mavproxy to confirm the connection.
mavproxy.py --master=udp:localhost:14470 --console --map --target-system=1 --target-component=0
You can also use it for various applications such as ROS.
Auto Mission Test