yes I tried different things
- 192.168.144.0
- 192.168.144.1
- 192.168.144.10
- 192.168.144.11
- 192.168.0.10
- 192.168.0.11
edit :
after few more tests I dont realy know why it was not working first time but now it looks to work with 192.168.144.11 as gateway
yes I tried different things
edit :
after few more tests I dont realy know why it was not working first time but now it looks to work with 192.168.144.11 as gateway
again this is by design, your use case does not make sense. and has no practical use the way you have drawn it.
there is no plan to add any spanning tree to the bridge.
i think either your not showing the entire story, or im missing the reason you need this in the first place
the only way to see that ip from the GCS unit is to use ethernet out on the GCS unit. the ip range is not routed via wifi etc.
I’m sorry but when trying with a USB<->ETHERNET on the remote it’s not working never
but when connecting PC on Android acess point it’s working great
Actualy, we need bonding(active-backup) on two side.Wired connection will be main and wifi connection is backup. Are there any way to do this. Because our vehicle is indoor-ground-vehicle and sometimes wireless connection is lost. In such cases, we want to use the wired connection.
I am using the Ethernet function for talking to the companion computer that is on the drone. But I want to eliminate some parts for weight saving. Our current setup:
Herelink Air unit -> USB to ethernet adapter -> USB to ethernet adapter -> Linux companion computer (without JR45 eth socket)
This system works perfectly, but it takes weight and space and it looks quite stupid, because it is just micro USB to micro USB with 2 of the same USB to ethernet adapters in between with a very short ethernet cable. Is there a way to make this smarter? Like using just micro USB to micro USB? With some changes in Linux?
Good Day
Try using UAVCast Pro( Introduction - UAVcast-Pro) licence key for 1 year is only 39 USD with a companion computer such as RasPi to reduce weight and get a LTE 4G setup for your drone application !!
I have set up a manual route on my pc that is connected to the hotspot: sudo ip route add 192.168.144.0/24 via 192.168.43.1 dev wlp0s20f3. A bit disappointed to see your reply that its not possible, how come I can access 192.168.144.10/11 but not my payload at 32?
192.168.144.11 would likely work
but 192.168.144.10 will not. reason being is that device has no default route, and is designed that way, to prevent any traffic leaking from the air unit to places it does not need to talk too. ie any traffic from that device will use valuable bandwidth that would otherwise be used for video or telemetry.
you could however add a default route to the air unit, and it would work.
create a file /sdcard/init.sh on the air unit and add
ip route add default via 192.168.144.11
Thanks for getting back to me, that makes sense except that I am able to both ping and connect to adb of both the air unit and the ground unit without any extra /sdcard/init.sh. See this screenshot:
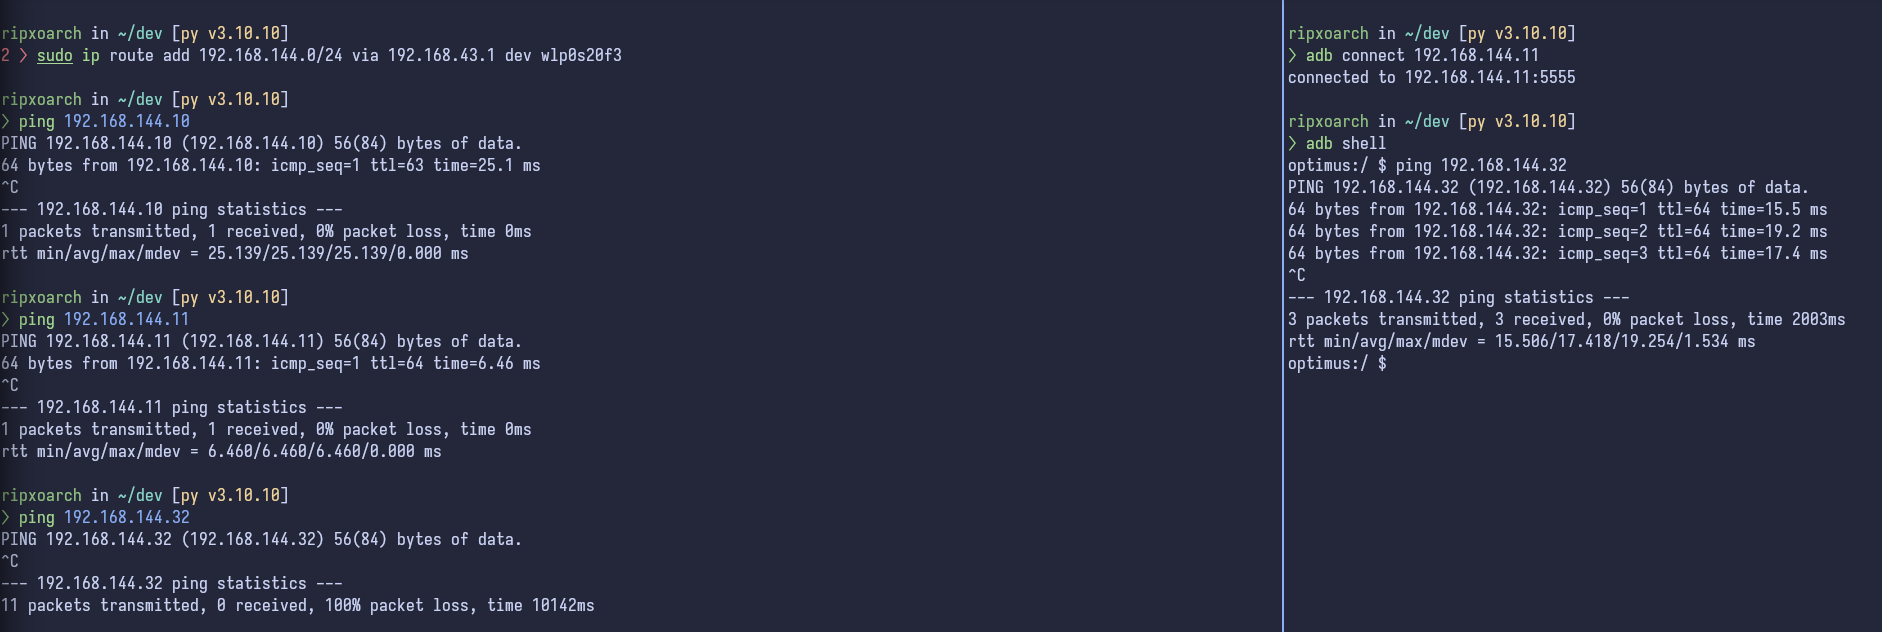
As you can see I can also ping the payload from the remote Ground unit adb shell.
What I am trying to achieve is to connect laptop->WiFi-> (GCS) i.e. 192.168.43.1->192.168.144.11 → Air unit 192.168.144.10 → On board computer 192.168.144.32.
Hi Philip, have you got this to work after this post? I have the same problem, the final connection of pinging from laptop to the payload pi is not successful.
To those who still have issues, here is what we do to get it work:
PS: you may encounter an issue of eth not connecting when the Microusb of airunit is plugged to the laptop for adb, which blocks the eth, just unplug it and move on.
Hi
Good detailed info.
Can this be utilized for Herelink v1.0 where we could get an airlink IP using a usb to ethernet adaptor connected on the Airlink unit.
Hi jacob,
We are using Heralink 1.1, which has an ethernet port, and we didn’t buy Heralink 1.0. And as far as i understand, the previous discussion in this page is with the setup you describe, and it doesn’t hurt for you guys to try, right?