WINDOWS USERS!
- Assuming you have already downloaded/installed the USB Driver ( https://herelinkfw.cubepilot.org/driver.msi ) and downloaded the latest flasher_win.exe ( https://herelinkfw.cubepilot.org/flasher_win.zip ), please extract then right click on this extracted flasher_win.exe file and in the list click on ‘Add Shortcut’. Depending on what Windows version you are using you may need to click on ‘More Options’ at the bottom to see ‘Add Shortcut’.
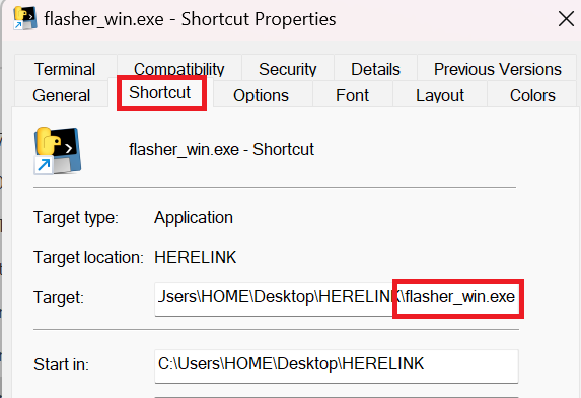
- Now that you have a new Shortcut file please right click this shortcut file and select properties from the list.
- We need to modify the name of the flasher_win.exe file name that may look something like this:
C:\Users\HOME\Desktop\HERELINK\flasher_win.exe
(Under the shortcut tab)
- At the end of this file we need to add beta to the end of flasher_win.exe so it looks like this- flasher_win.exe beta
(beta must be LOWERCASE or the update will NOT work) There also must be a single space in between .exe and beta
flasher_win.exe beta
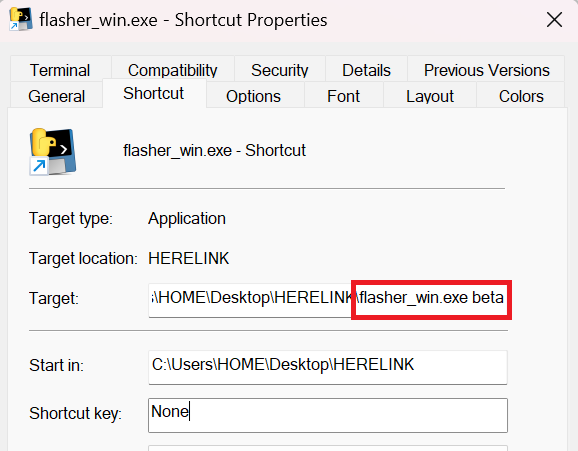
- Click OK at the bottom to save it.
- Power on your airunit. You dont need the sbus or UART cables connecred but you should have the antennas connected to the air unit.
- Plug a USB cable into the air unit then open the shortcut file you created above.
- Once the file is opened it will say Looking for Device…
- Now plug the other end of your USB cable thats plugged into the air unit into your PC/Laptop.
- Assuming your PC/Laptop is already connected to the internet by WIFI or mobile phone hotspot your beta updates will start downloading.
- Once all downloaded and extracted and flashed it will say press ENTER to continue. Press Enter key
- Your shortcut file that you opened will close. Your air unit is now updated.
- Disconnect power to the air unit.
- Power on the air unit and your Herelink controller.
- You will need to pair it first (In Herelink Settings) as the air unit was flashed.
- Once paired click on Air Unit in Herelink settings to confirm the update was successful.
- Check online version and see if there is a newer update.
- Open Mission Planner and connect wirelessly to Herelink. (Your Herelink controller should be connected to a local WIFI/ Phone hotspot connection using 5Gz. Please do NOT use Herelink controllers HOTSPOT)
- Go to Radio Calibration in Mission Planner and move stick around on your Herelink controller to confirm your sbus out is working.
- ENJOY
-Andrew